
This guide covers three ways to install AiO Podcast Studio on your WordPress website, followed by activation and update instructions. Choose the method that suits your situation — all three lead to the same result.
Contents
- Requirements
- Method 1 — Install from WordPress.org
- Method 2 — Upload a ZIP File
- Method 3 — Manual FTP Installation
- Activate the Plugin
- Keeping the Plugin Up to Date
Requirements
Before installing, confirm your site meets the minimum requirements:
- WordPress: version 6.3 or later
- PHP: version 7.4 or later
- Browser: any modern browser (Chrome, Firefox, Safari, Edge)
You can check your WordPress and PHP versions by going to Dashboard → Updates in your WordPress admin.
Method 1 — Install from WordPress.org
This is the easiest and most common way to install the plugin. WordPress connects directly to the plugin directory and handles the download for you — no files to manage.
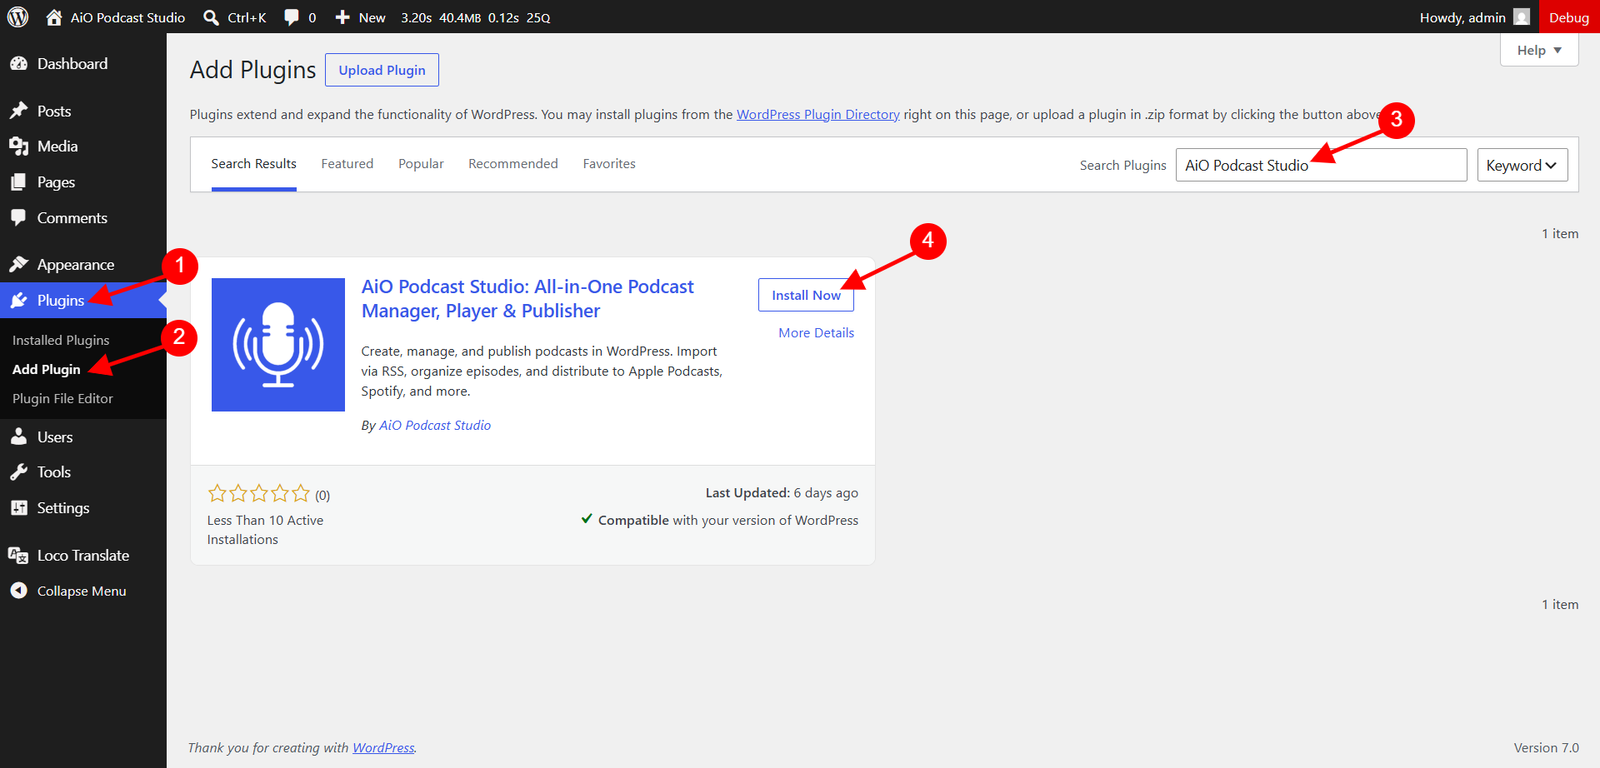
- Log in to your WordPress Admin Dashboard.
- In the left menu, go to Plugins → Add New Plugin.
- In the search bar at the top right, type AiO Podcast Studio.
- Find the plugin in the search results and click Install Now.
- Wait for the installation to finish, then click Activate.
That is all there is to it. Continue to the Activation section below to confirm everything is working.
Method 2 — Upload a ZIP File
Use this method if you have downloaded the plugin ZIP file directly — for example, after purchasing a premium version or receiving a file from a developer.
- Log in to your WordPress Admin Dashboard.
- Go to Plugins → Add New Plugin.
- Click the Upload Plugin button at the top of the page.
- Click Choose File and select the
aio-podcast-studio.zipfile from your computer. - Click Install Now.
- When the installation completes, click Activate Plugin.
If WordPress reports a file size error during upload, your server’s maximum upload size may be too small. You can ask your hosting provider to increase it, or use Method 3 below to install via FTP instead.
Method 3 — Manual FTP Installation
This method is for advanced users who prefer to manage files directly on the server, or for situations where the WordPress admin upload is not available. You will need an FTP client such as FileZilla and your server’s FTP credentials.
- Download the plugin ZIP file from WordPress.org or from your account.
- Extract the ZIP file on your computer. You should get a folder named
aio-podcast-studio. - Open your FTP client and connect to your server.
- Navigate to the
/wp-content/plugins/directory on your server. - Upload the entire
aio-podcast-studiofolder into that directory. - Once the upload is complete, log in to your WordPress Admin Dashboard.
- Go to Plugins → Installed Plugins, find AiO Podcast Studio in the list, and click Activate.
Activate the Plugin
If you clicked Activate immediately after installing, the plugin is already active and you can move on. If you skipped that step or installed via FTP, here is how to activate it.
- Go to Plugins → Installed Plugins in your WordPress admin.
- Find AiO Podcast Studio in the list.
- Click Activate beneath the plugin name.
After activation, a Podcasts menu will appear in your WordPress sidebar. This confirms the plugin is installed and running correctly. From here you can create podcasts, add episodes, and display content on your website.
Keeping the Plugin Up to Date
Keeping the plugin updated ensures you have the latest features, compatibility fixes, and security improvements. WordPress checks for updates automatically and will notify you when a new version is available.
Update from the WordPress dashboard
When an update is available, a notification will appear in Plugins → Installed Plugins next to AiO Podcast Studio. Click Update Now and WordPress will download and apply the update automatically.
Update by uploading a new ZIP file
If you have a new ZIP file to install — for example, a premium release — go to Plugins → Add New Plugin → Upload Plugin, select the new ZIP, and click Install Now. WordPress will detect that the plugin already exists and offer to replace it. Click Replace current with uploaded to complete the update.
It is always a good idea to take a site backup before running any plugin update, especially on a live website.