
Before Offload Media – Cloud Storage can move your podcast files to Amazon S3, you need three things from Amazon Web Services: an IAM user with S3 permissions, that user’s access keys, and an S3 bucket to hold your files. This tutorial walks you through setting up each one, connecting the plugin, and — optionally — putting a CloudFront CDN in front of your bucket for faster delivery.
💡 Note: Offload Media – Cloud Storage works with several storage providers — Amazon S3, Google Cloud Storage, DigitalOcean Spaces, Cloudflare R2, Wasabi, and MinIO. In this tutorial, we use Amazon S3 as the example. If you use a different provider, the overall flow is the same — create access credentials, create a storage bucket, and connect them in the plugin — but the exact steps happen in your provider’s own dashboard. For provider-specific setup guides and further details, see the official plugin documentation.
Contents
- Sign In to the AWS Console
- Create an IAM User
- Create an S3 Bucket
- Fix Bucket Permission Issues (If Needed)
- Install Offload Media – Cloud Storage
- Connect the Offload Media Plugin
- Set Up a CloudFront CDN (Optional)
Sign In to the AWS Console
Everything in this tutorial happens inside the AWS Management Console. Sign in with your existing AWS account, or create a free account at the AWS sign-up page first. Once signed in, you will land on the AWS Management Console dashboard — this is your starting point for the next two sections.
Create an IAM User
The plugin should never use your main AWS account credentials. Instead, create a dedicated IAM user that only has permission to work with S3.
Add the user
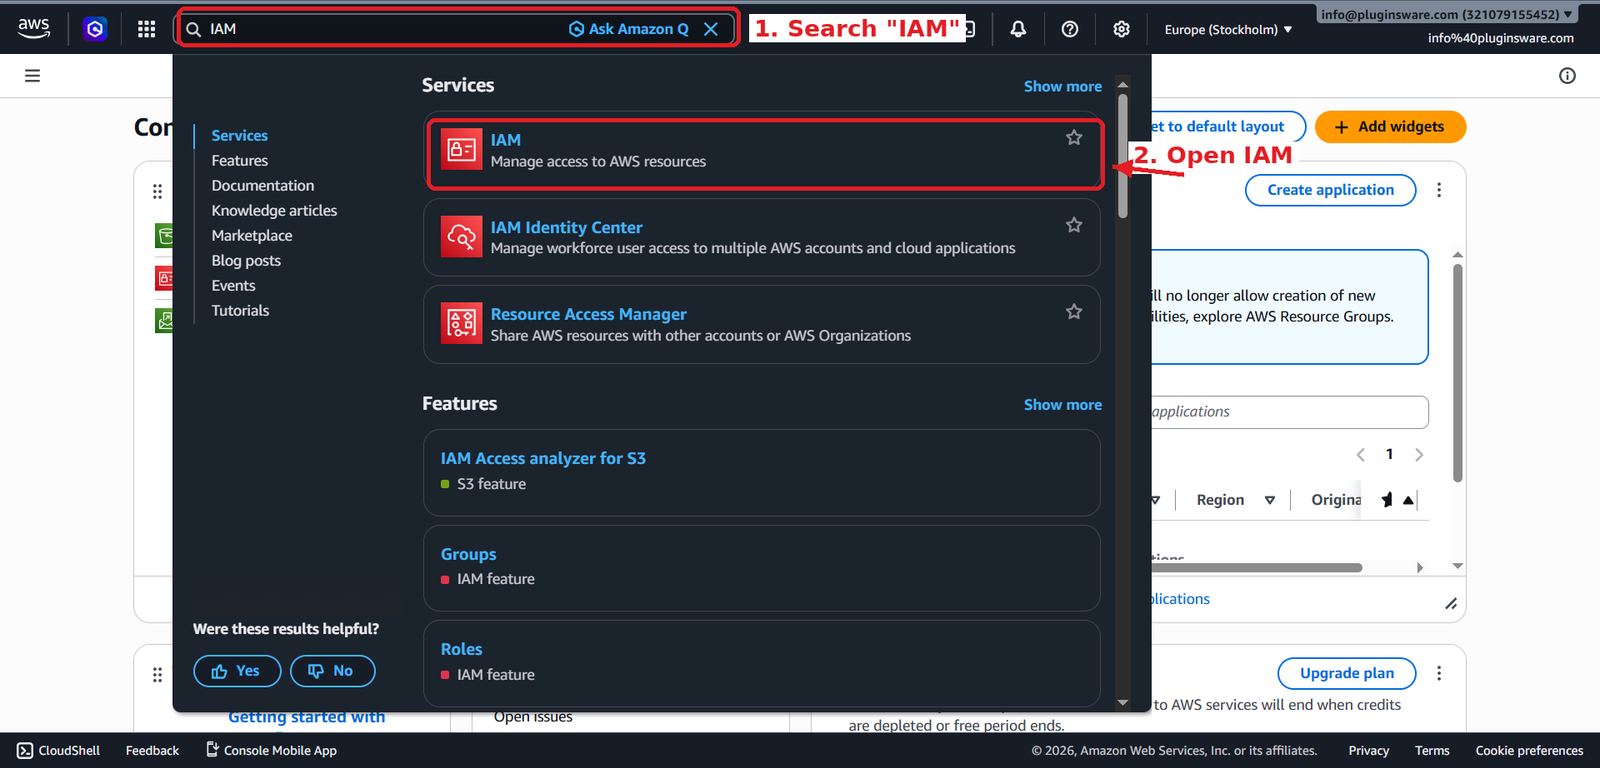
- In the search bar at the top of the AWS Console, type IAM and open it.
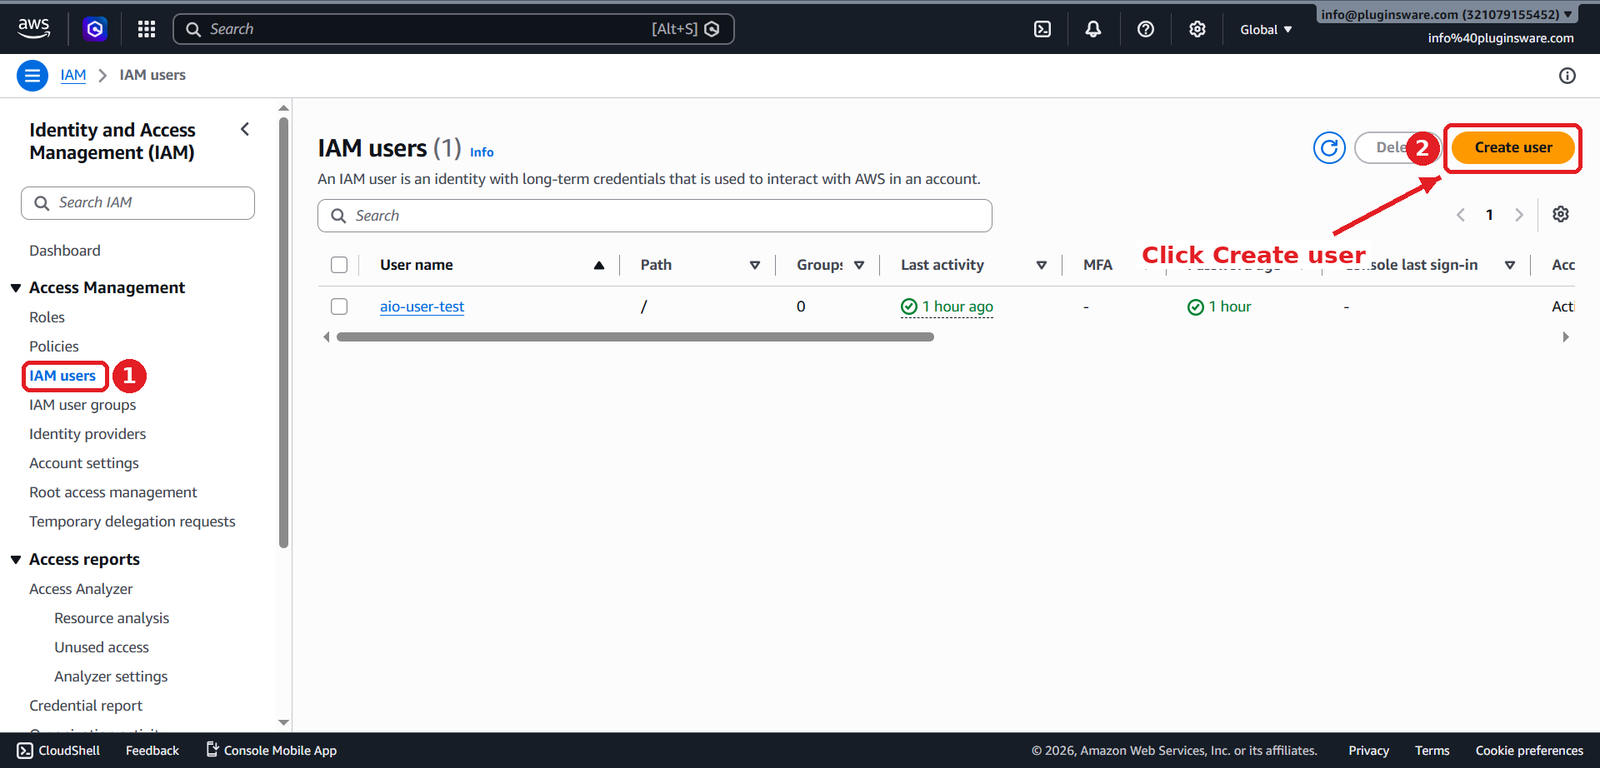
- Click the Users tab, then click Create user.
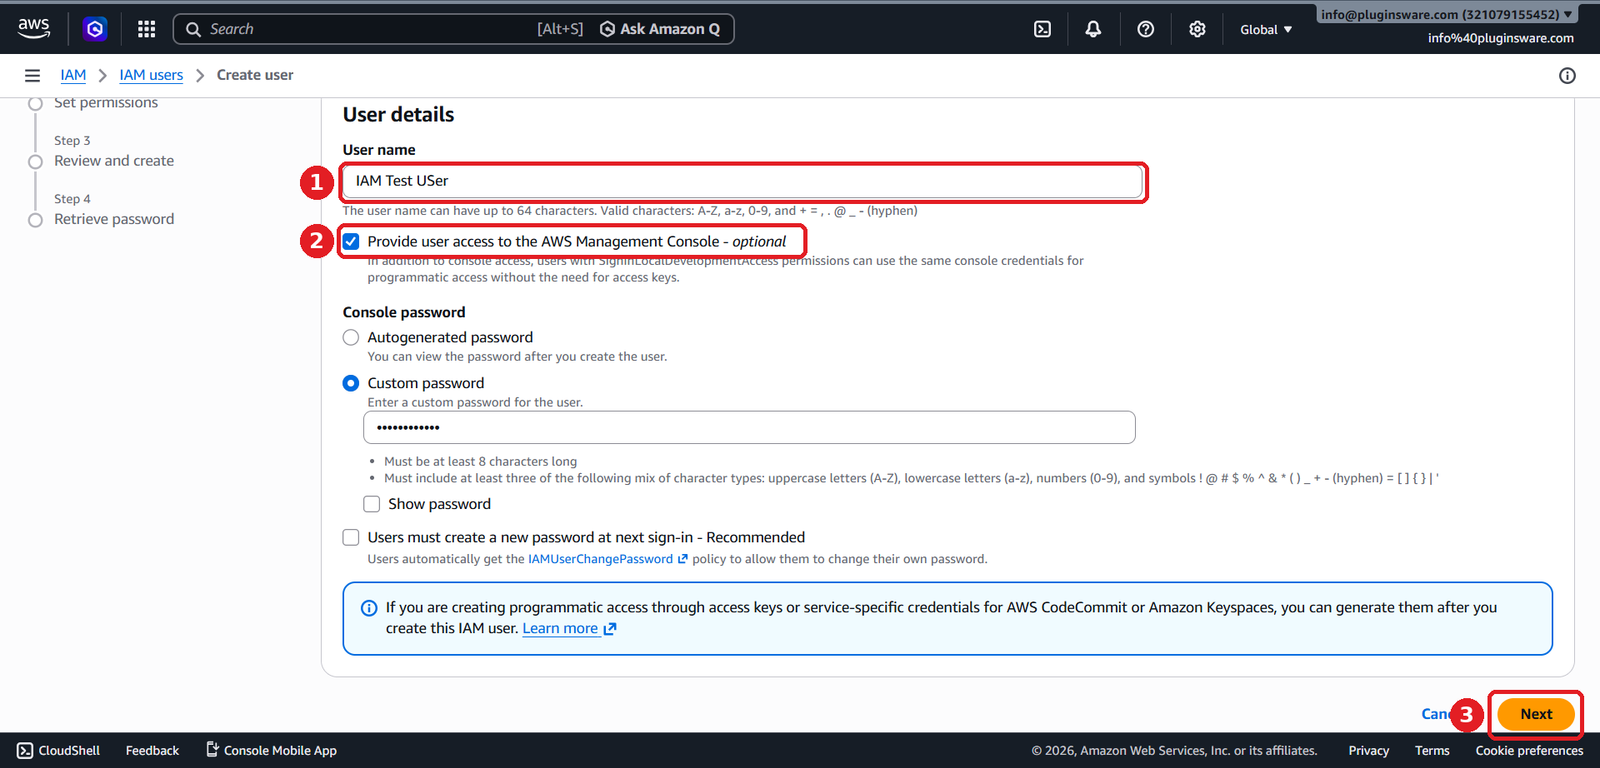
- Enter a username. Usernames are case-insensitive, must be unique within your AWS account, and may contain letters, digits, and the symbols + = , . @ and hyphen.
- Tick Provide user access to the AWS Management Console below the username field.
- Choose I want to create an IAM user, set a strong console password, and click Next.
Give the user S3 access
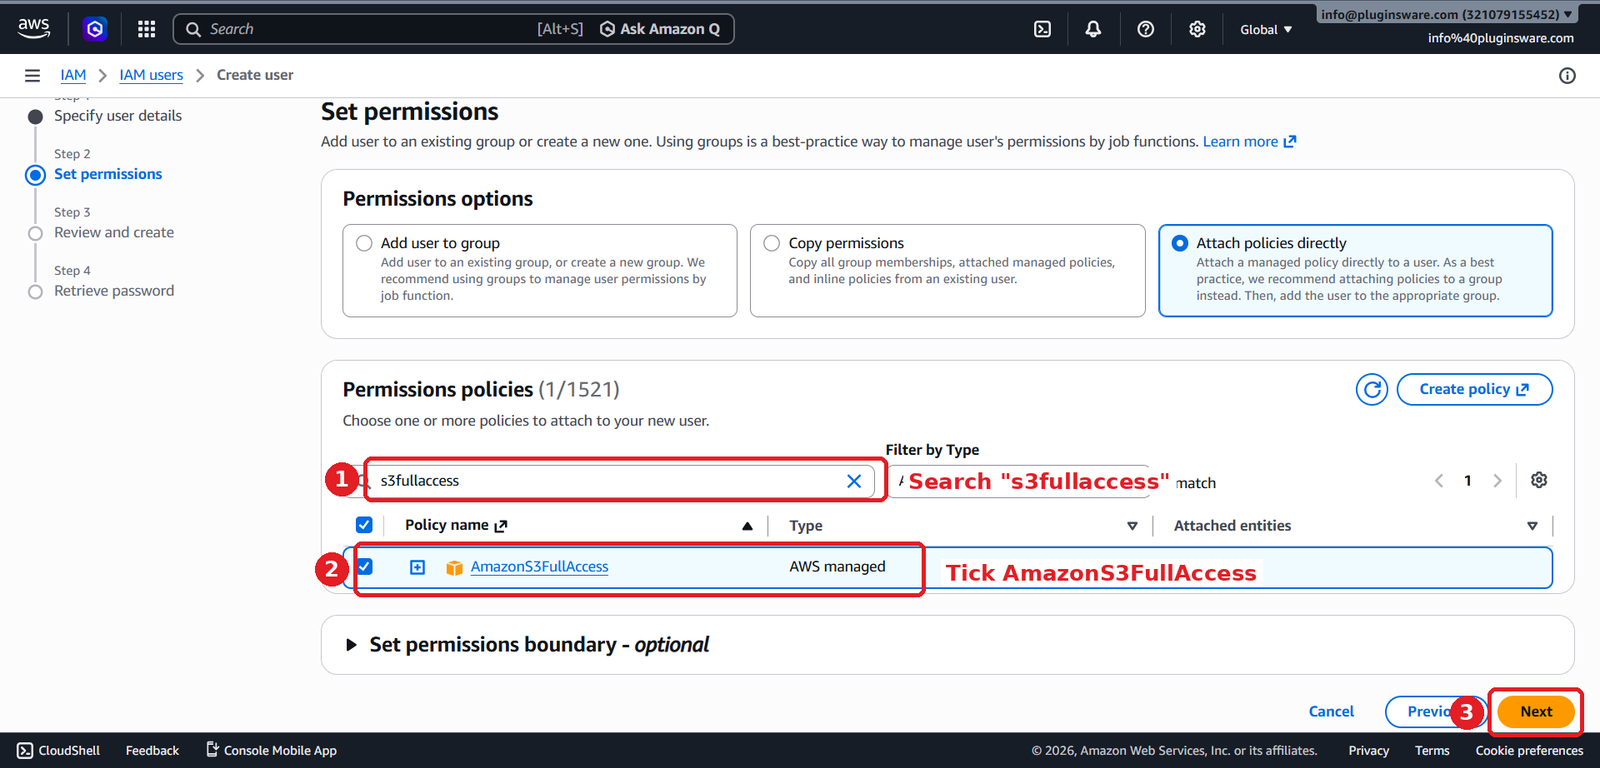
- On the Permissions page, choose Attach policies directly.
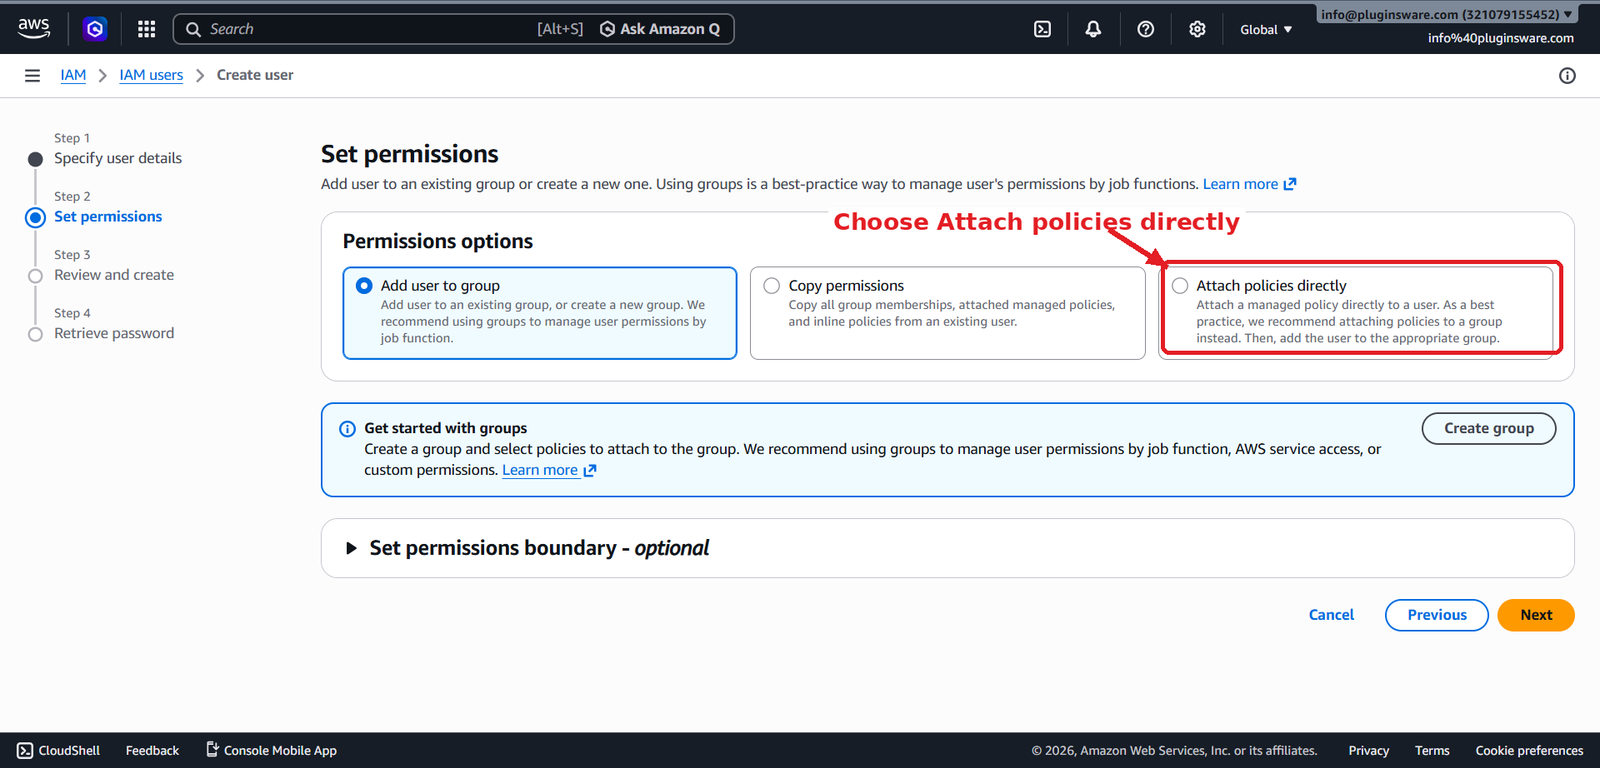
- Type s3fullaccess in the search bar, tick AmazonS3FullAccess, and click Next.
- Skip the optional Tags section, review the username, access type, and permissions on the summary screen, and click Create user.
Download the access keys
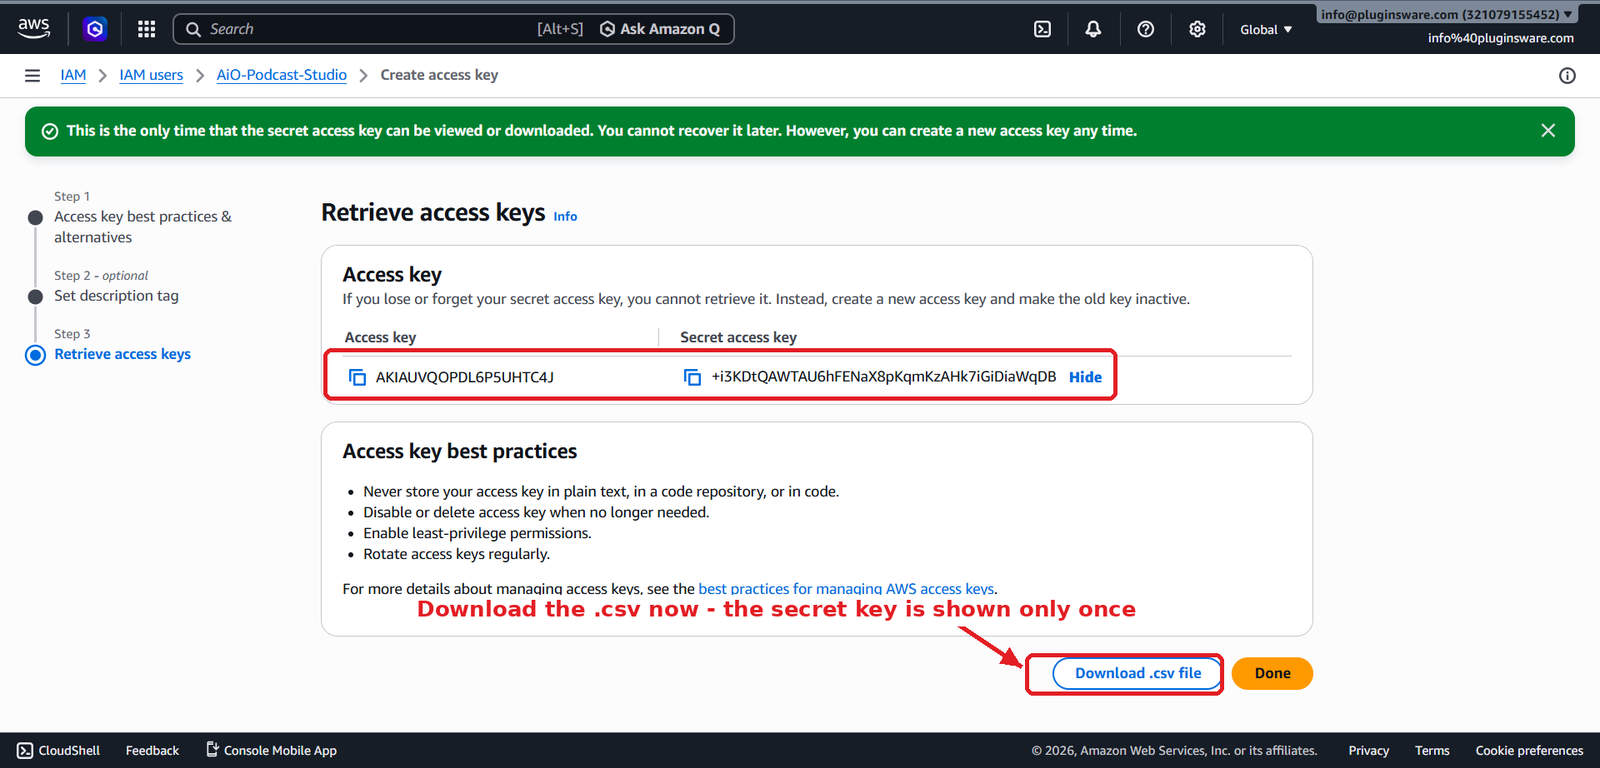
After the user is created, AWS shows the user’s security credentials — the Access Key ID and the Secret Access Key. Download them as a .csv file using the button provided. This matters more than it looks: AWS shows the Secret Access Key only this one time and it cannot be recovered later. If you ever lose it, you will have to generate a new key pair from the IAM console. When you have the file saved, click Return to users list.
Create an S3 Bucket
A bucket is the container in an AWS Region that will hold your offloaded podcast files.
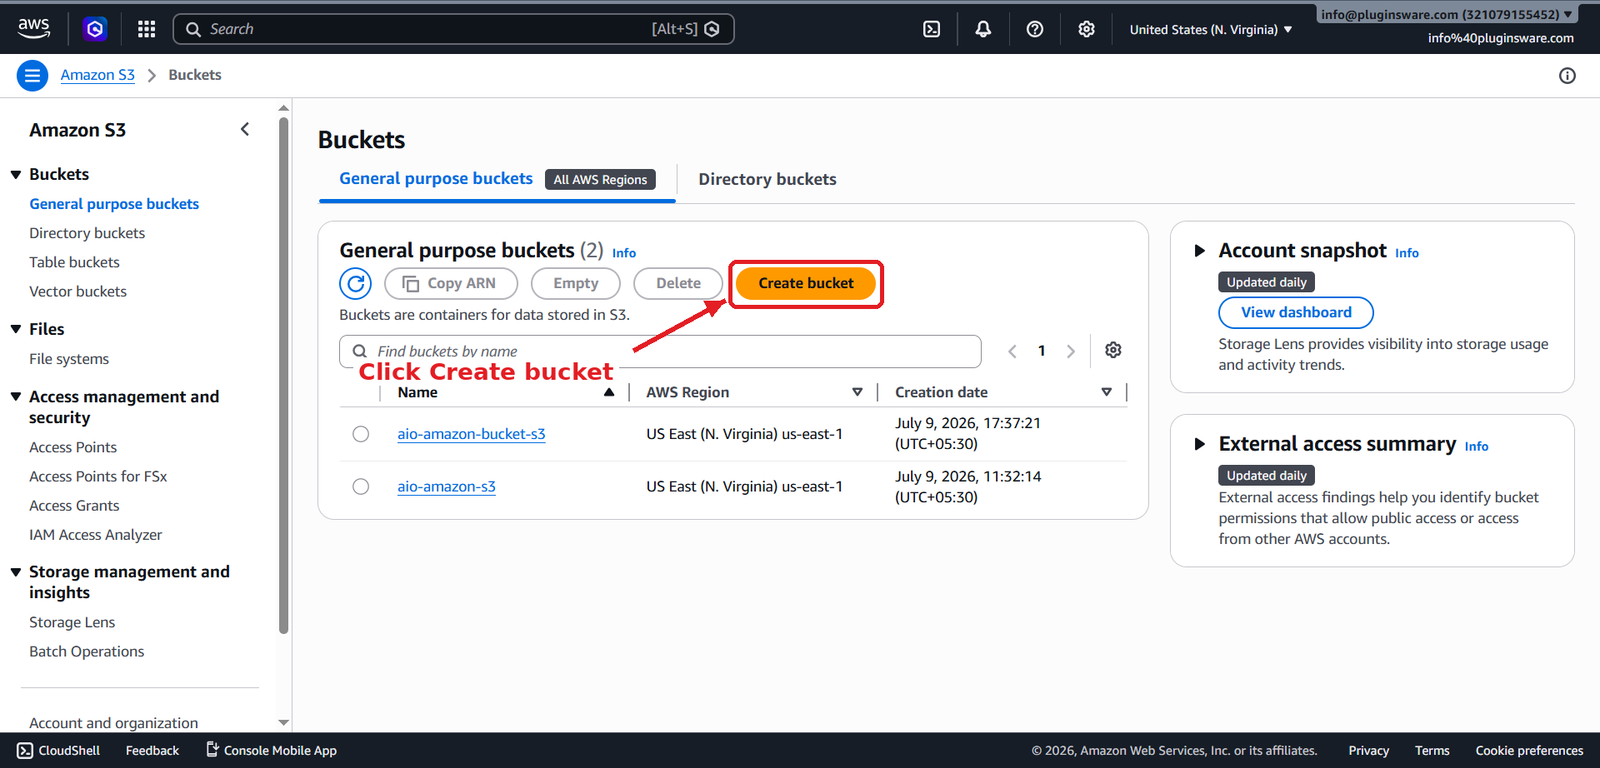
- From the AWS Console, type Amazon S3 in the search bar and open S3 – Scalable Storage in the Cloud.
- Click Create Bucket.
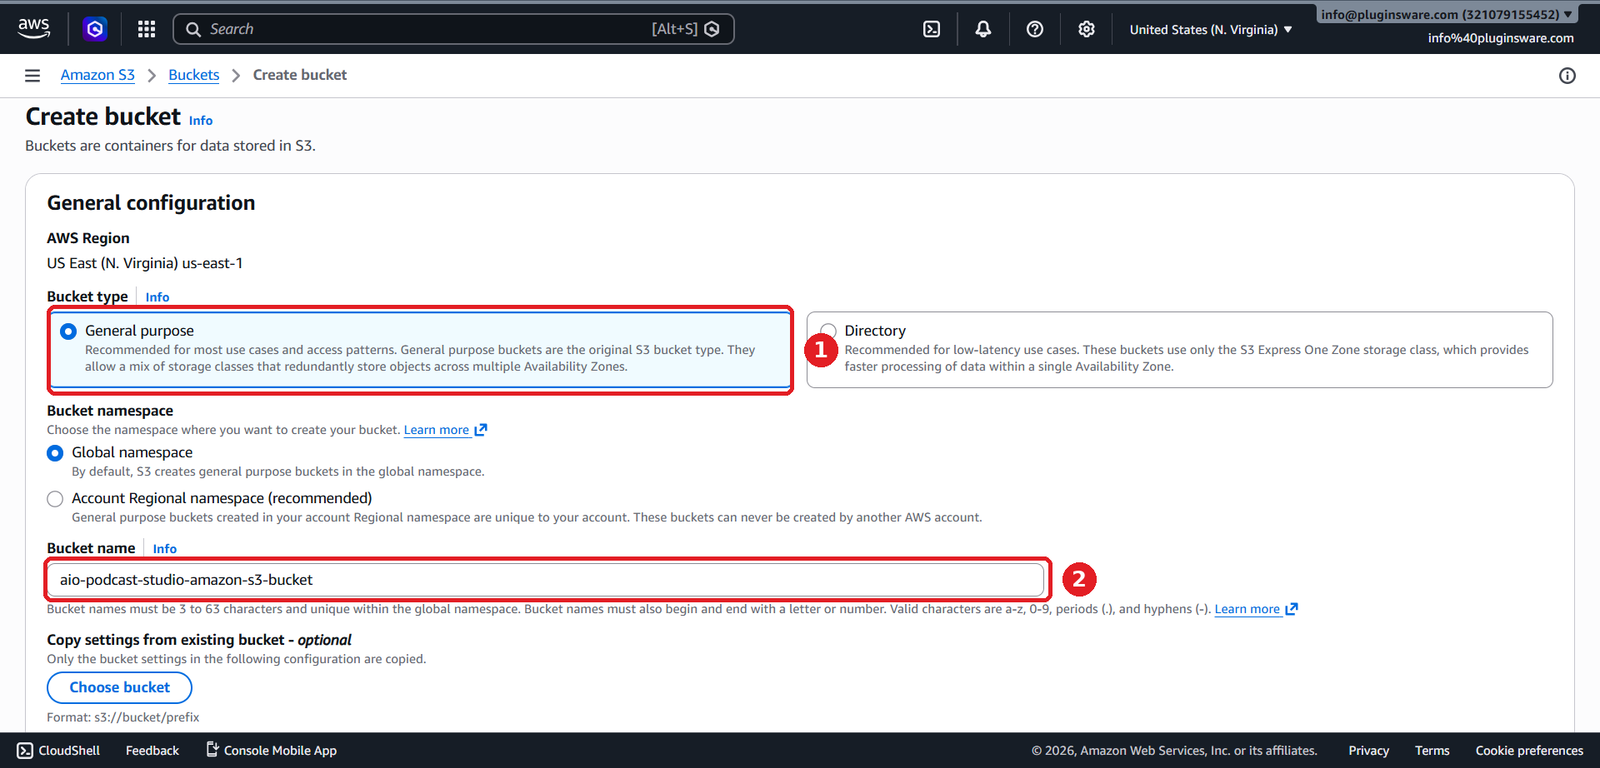
- In General Configuration, choose General purpose as the bucket type and enter a name in the Bucket Name field. (Choose Directory instead only if you specifically need to pin the bucket to a region this way.)
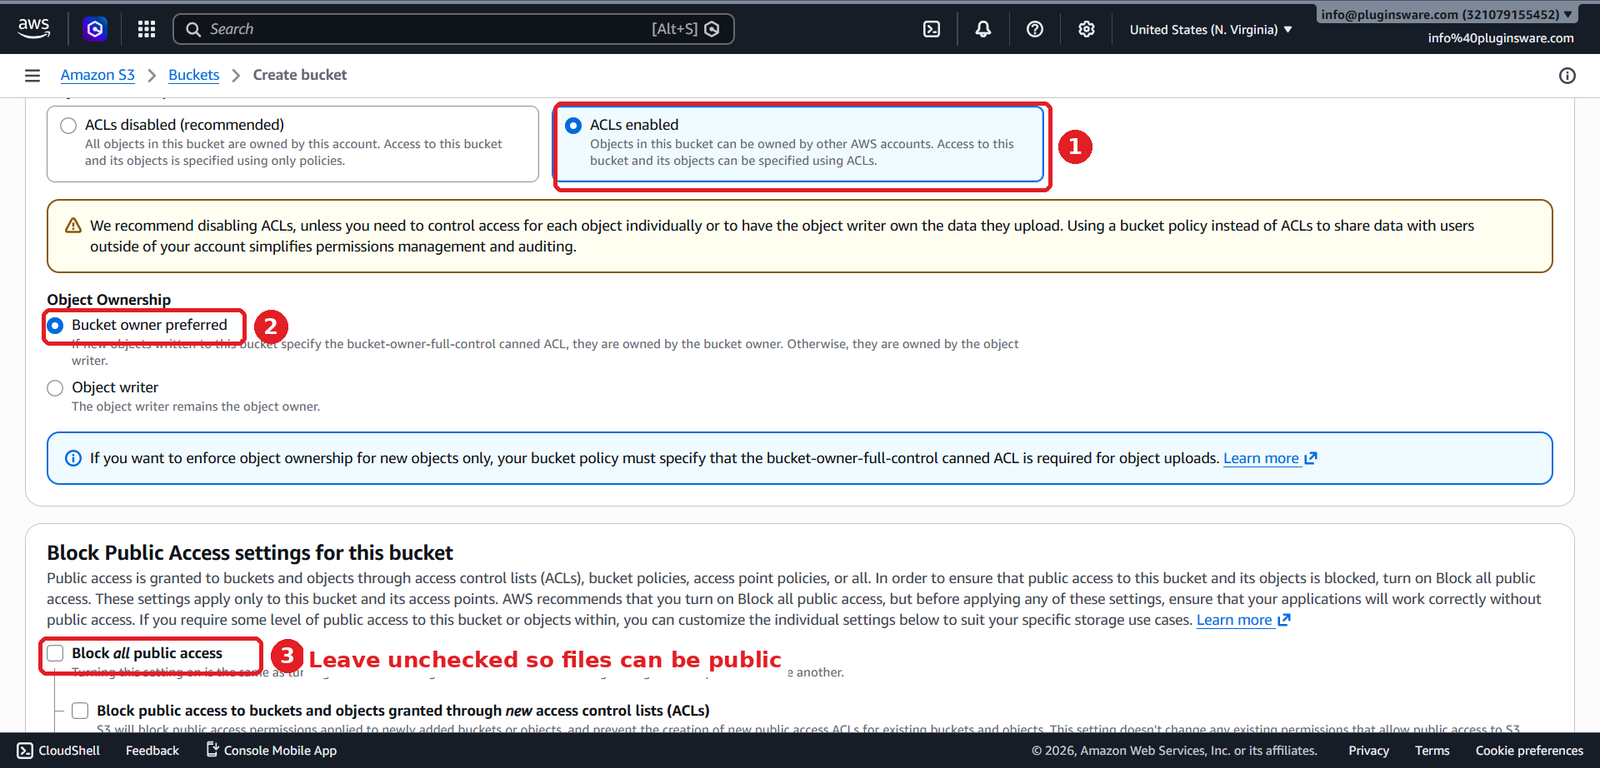
- In Object Ownership, select ACLs enabled and keep Bucket owner preferred selected. The plugin uses ACLs to make individual media files publicly readable.
- In Block Public Access, uncheck Block all public access and make sure all four checkboxes underneath are unchecked, then tick the acknowledgment warning that appears. Your listeners’ browsers need to be able to load the media files directly from the bucket.
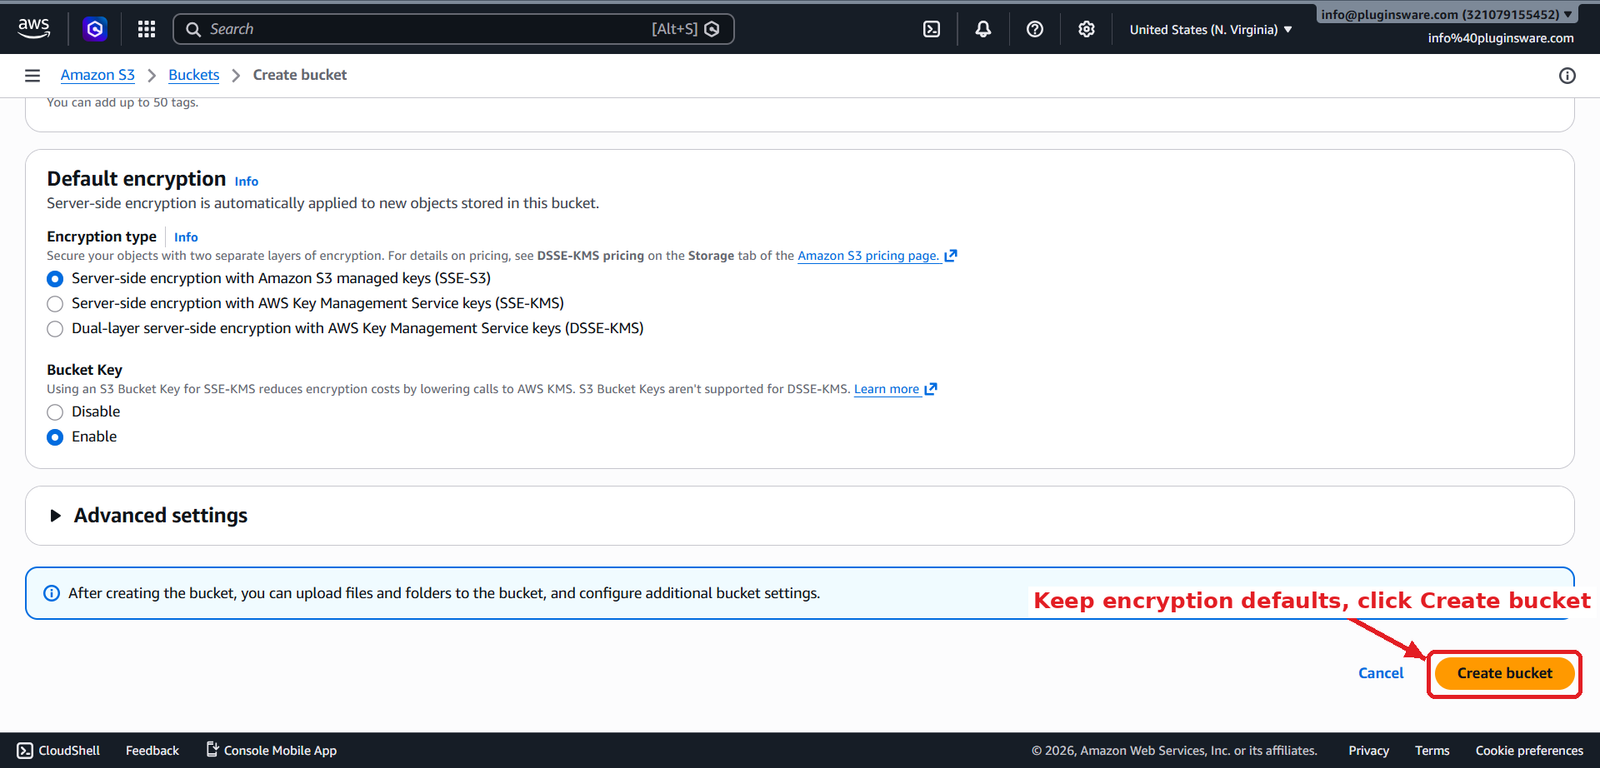
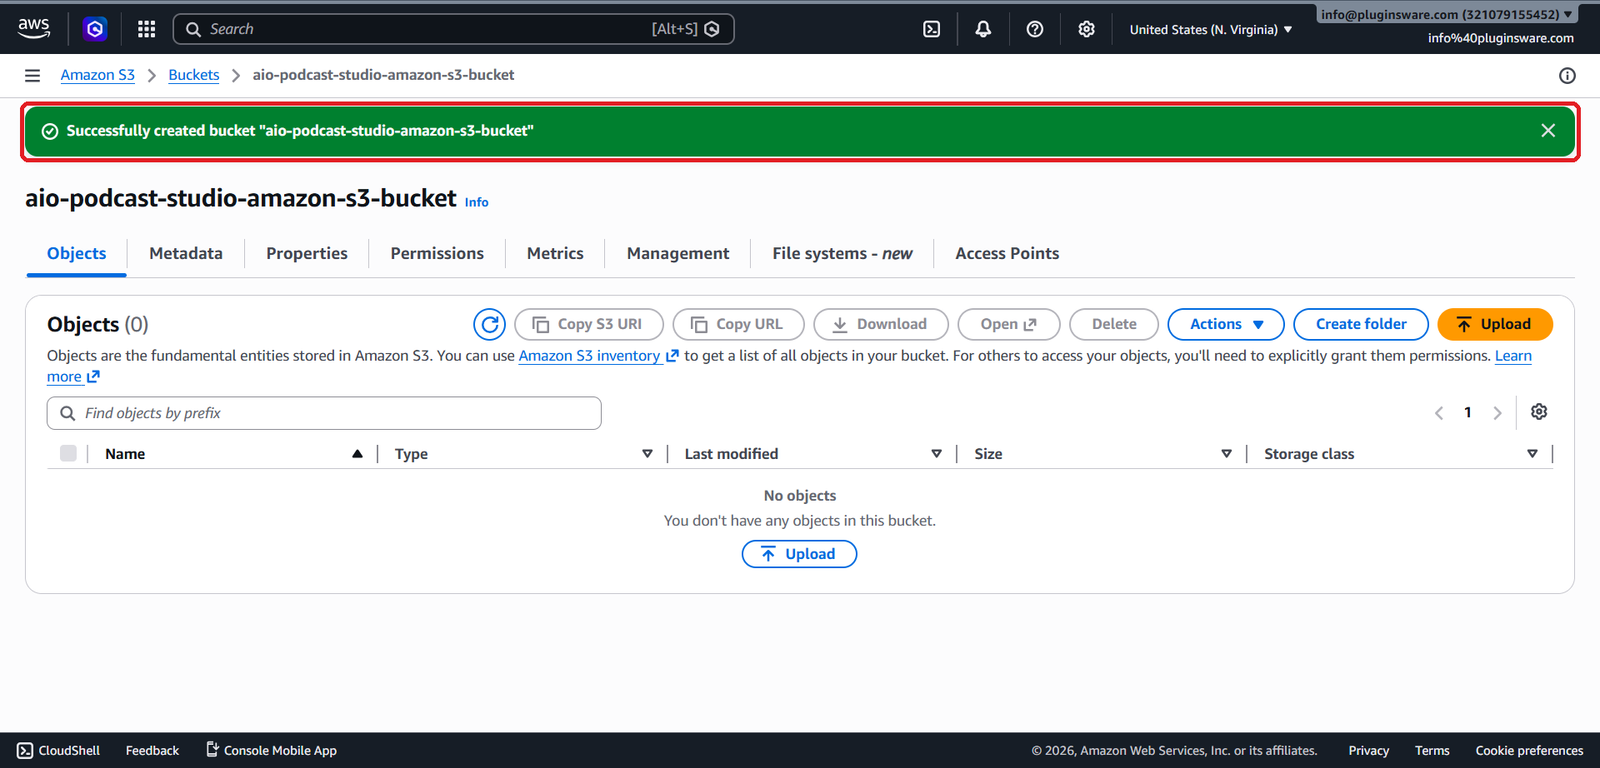
- Leave the remaining advanced settings at their defaults and click Create Bucket. A success message appears at the top of the page when the bucket is ready.
Fix Bucket Permission Issues (If Needed)
If the plugin later reports permission errors when writing to the bucket, attach a bucket policy that explicitly grants your IAM user the required actions:
- In the S3 console, open your bucket and go to the Permissions tab.
- Under Bucket Policy, click Edit.
- Paste the policy below, replacing the IAM user ARN with your own user’s ARN and BUCKET_NAME with your actual bucket name.
- Click Save changes.
{
    "Version": "2012-10-17",
    "Statement": [
        {
            "Effect": "Allow",
            "Principal": {
                "AWS": "arn:aws:iam::6580xxxx007:user/demo"
            },
            "Action": [
                "s3:DeleteObjectTagging",
                "s3:ListBucketMultipartUploads",
                "s3:DeleteObjectVersion",
                "s3:ListBucket",
                "s3:DeleteObjectVersionTagging",
                "s3:GetBucketAcl",
                "s3:ListMultipartUploadParts",
                "s3:PutObject",
                "s3:GetObjectAcl",
                "s3:GetObject",
                "s3:AbortMultipartUpload",
                "s3:DeleteObject",
                "s3:GetBucketLocation",
                "s3:PutObjectAcl"
            ],
            "Resource": [
                "arn:aws:s3:::BUCKET_NAME/*",
                "arn:aws:s3:::BUCKET_NAME"
            ]
        }
    ]
}
Install Offload Media – Cloud Storage
With the AWS side ready, install the plugin on your WordPress site:
- Log in to your WordPress Admin Dashboard.
- In the left menu, go to Plugins → Add New Plugin.
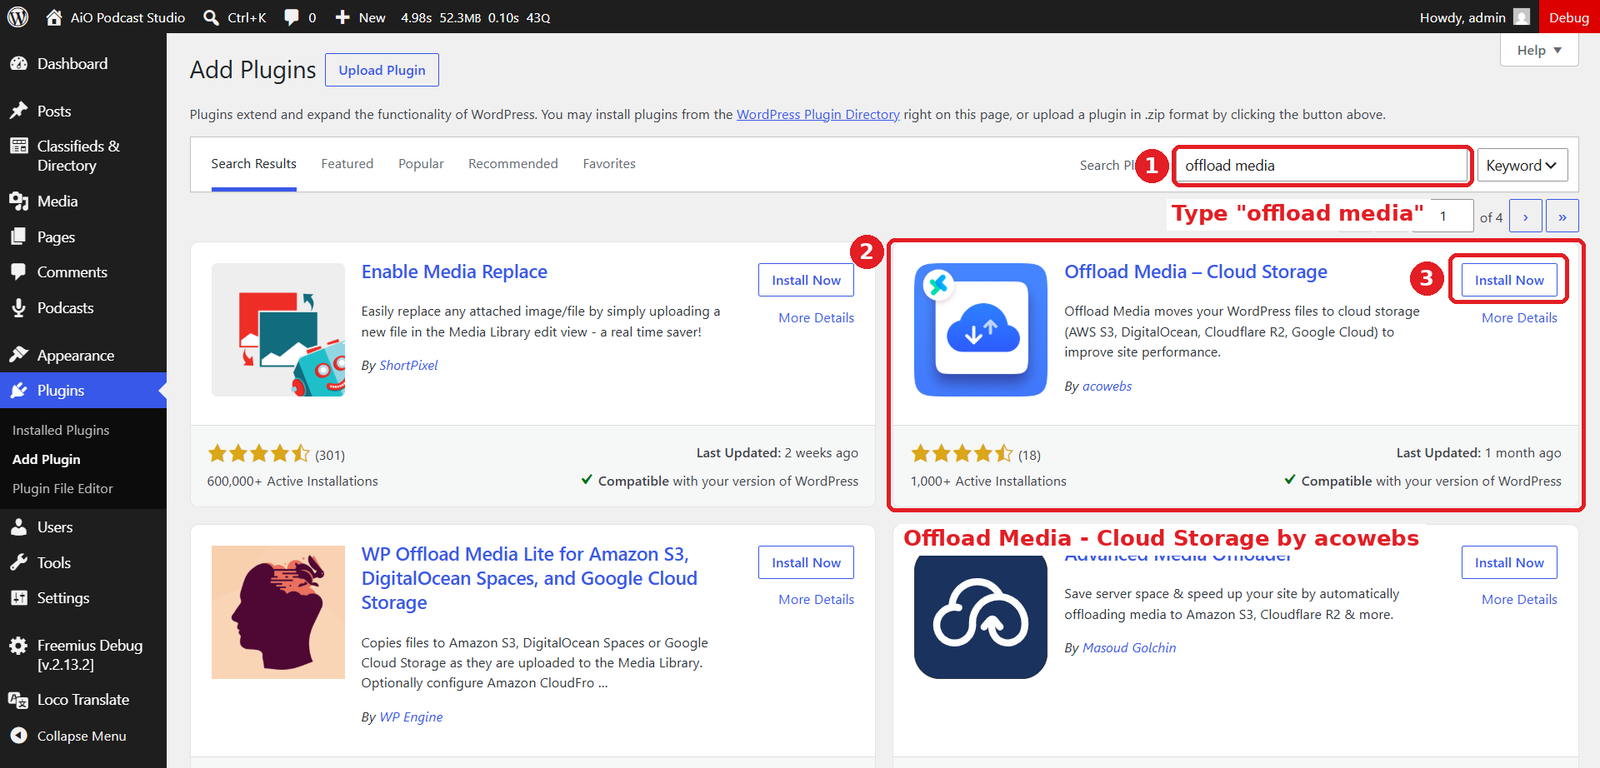
- In the search bar at the top right, type Offload media.
- Find Offload Media – Cloud Storage by acowebs in the search results and click Install Now.
- Wait for the installation to finish, then click Activate.
Connect the Offload Media Plugin
With the IAM user and bucket in place, the WordPress side takes only a minute:
- In your WordPress dashboard, go to Offload Media → Configure.
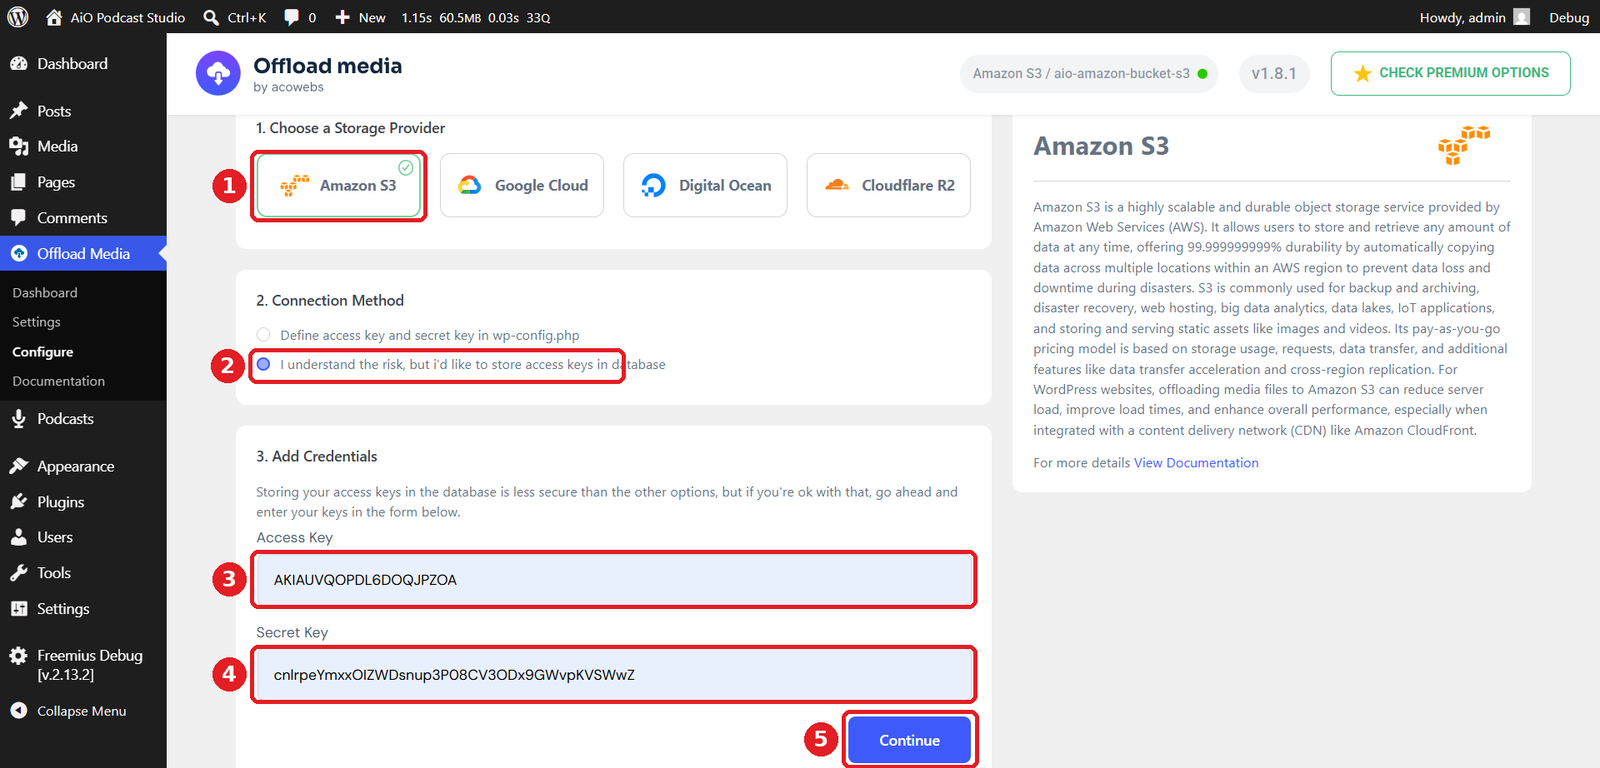
- Choose Amazon S3 from the list of cloud storage services, and pick your connection method — storing the keys in the database is the quickest option.
- Enter the Access Key and Secret Key from the .csv file you downloaded earlier, then click Continue. You should see a confirmation that the connection is valid.
- On the Bucket Settings step, choose I already have an S3 bucket and select your bucket from the dropdown list. If you skipped bucket creation earlier, you can also choose Create a new S3 bucket to create one directly from the plugin.
- Click Save & Continue.
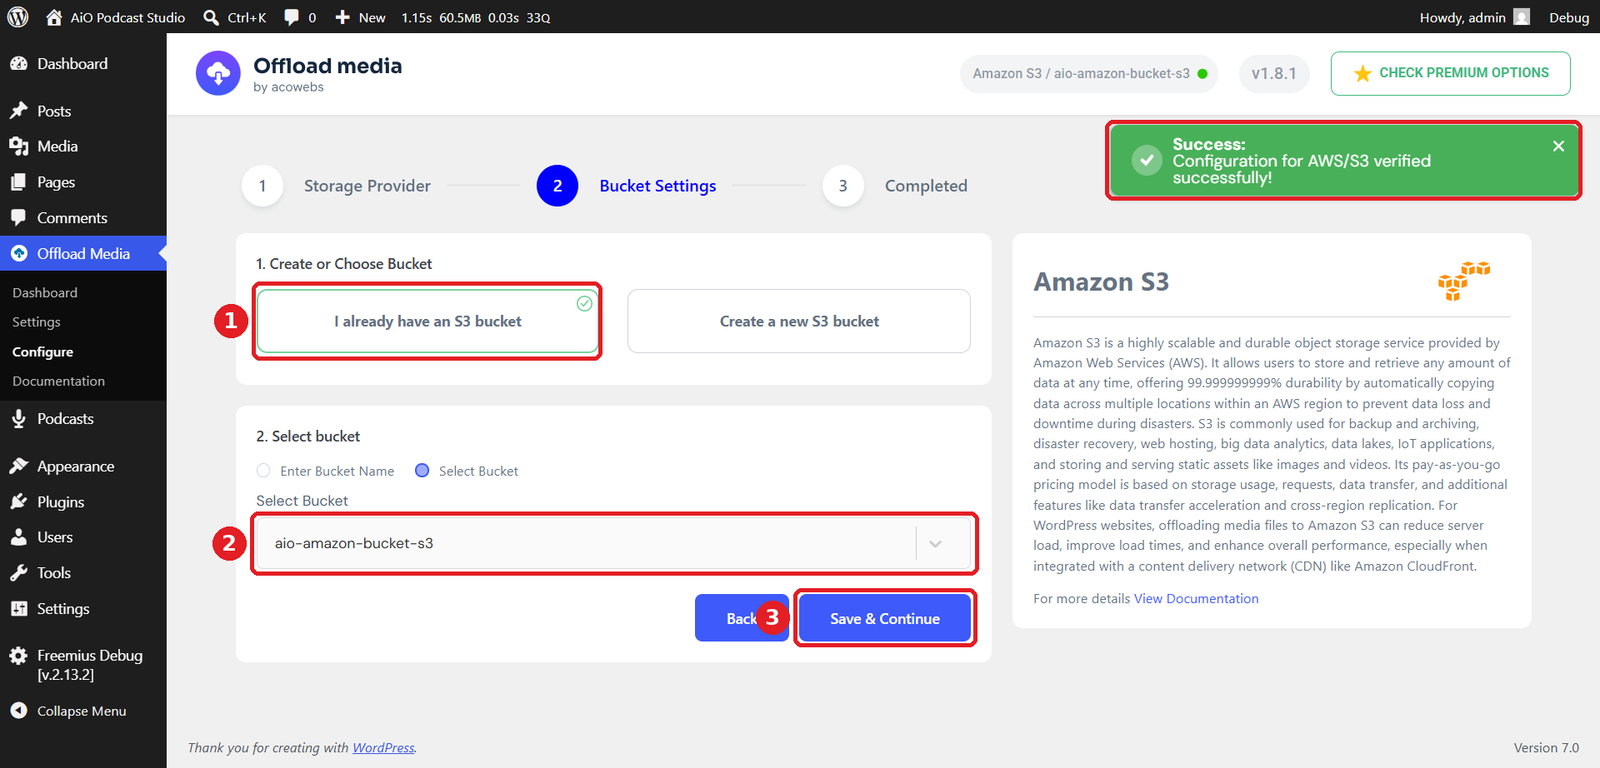
That completes the connection — your media files are now ready to be offloaded to Amazon S3. To turn on automatic offloading for your podcast audio and images, continue with the Offload Media – Cloud Storage Integration tutorial.
Set Up a CloudFront CDN (Optional)
Serving files straight from S3 works fine, but putting Amazon’s CloudFront CDN in front of your bucket delivers your audio and images from servers closer to each listener:
- In the AWS Console, type CloudFront in the search bar and open it.
- Click Create a CloudFront distribution.
- Choose Amazon S3 as the origin type, then in Origin Domain Name, enter your S3 bucket address (for example, mybucket.s3.amazonaws.com) or click Browse S3 to pick it. You can optionally set the Origin path to /wp-content so the distribution serves only your media folder.
- Under Origin Access, select Origin Access Control Settings (Recommended) and click Create new OAC — or pick an existing origin access control if you have one.
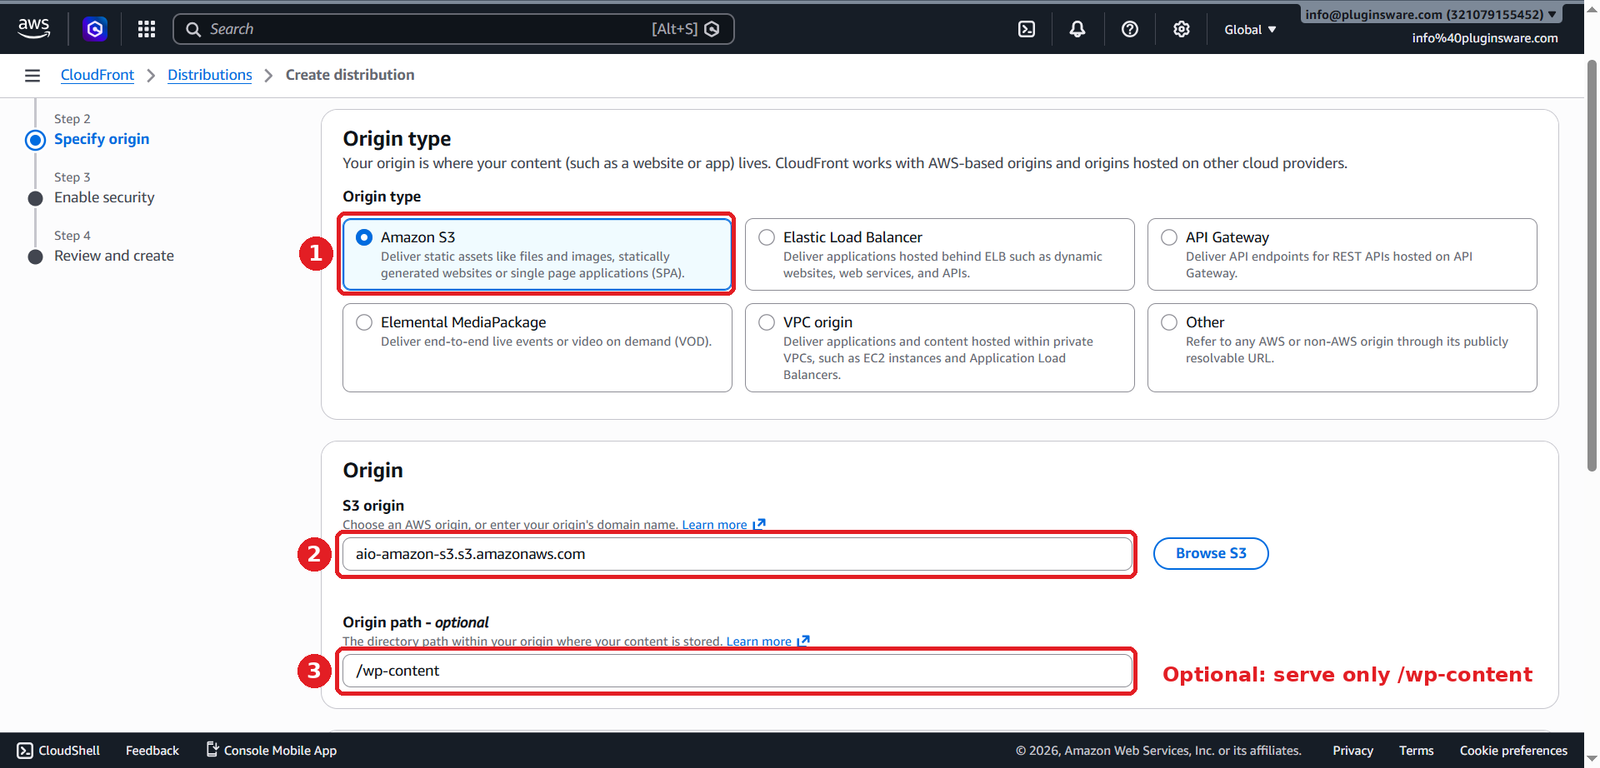
- Leave the remaining fields at their defaults, review your settings, and click Create Distribution. Deployment can take a little while to complete.
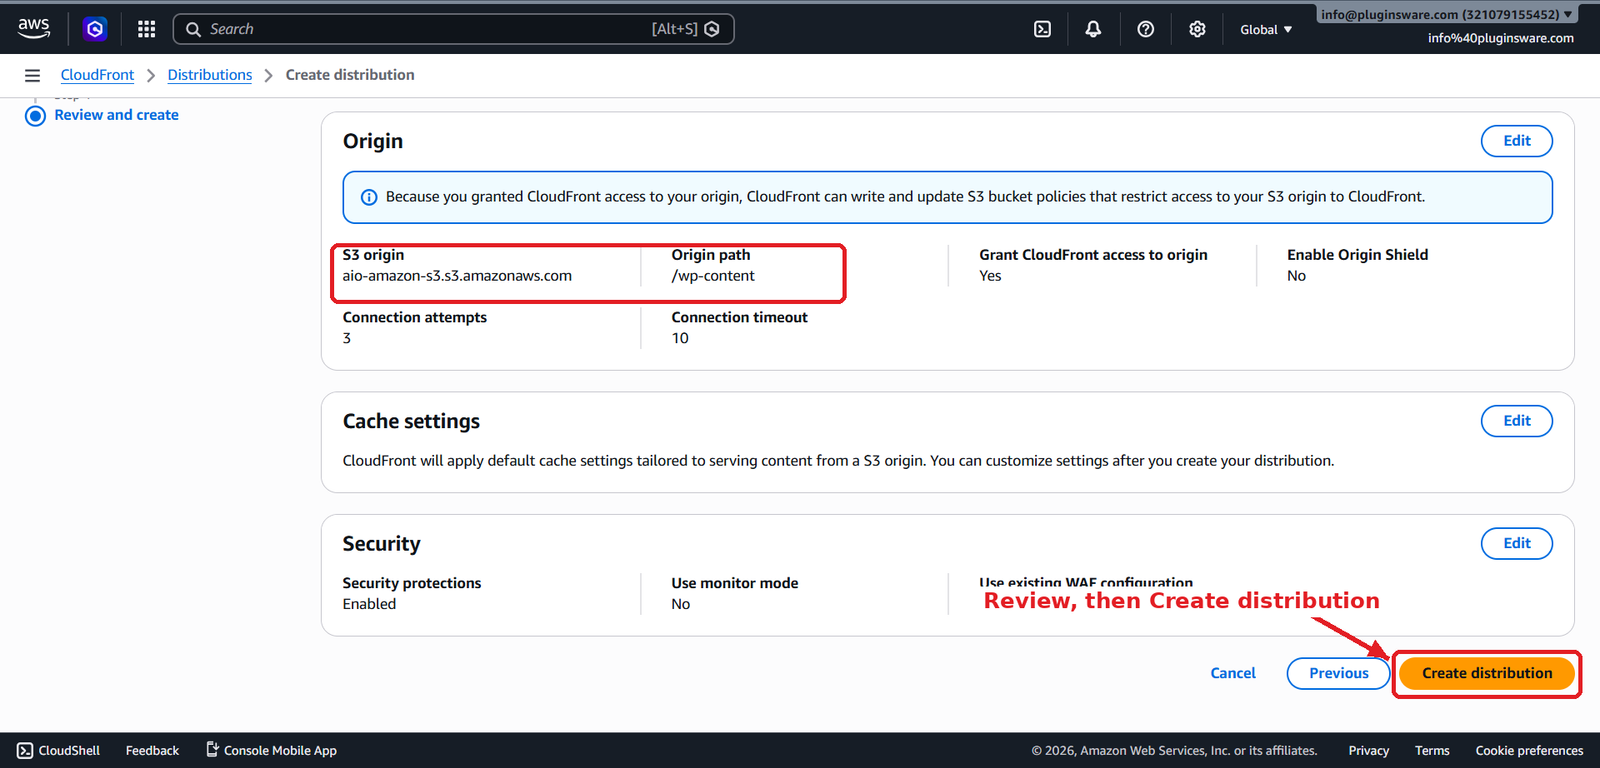
Once the distribution status changes to Deployed, copy its domain name (for example, d1234abcd.cloudfront.net) and enter it in the plugin’s custom CDN URL setting so your media links are served through CloudFront instead of directly from the bucket.
Setup Complete 🎉
That’s it — your cloud storage setup is complete! You now have a dedicated IAM user with S3 access, a bucket ready to hold your podcast files, the Offload Media – Cloud Storage plugin connected to it, and (optionally) a CloudFront CDN delivering your media from servers closer to your listeners. From here, every step of the AWS side is done and you can manage everything from your WordPress dashboard.
The next step is to switch on automatic offloading so your podcast audio and episode images move to the cloud as soon as you upload them — the Offload Media – Cloud Storage Integration tutorial walks you through it. And if you run into anything provider-specific along the way, the official plugin documentation is a great reference. Happy podcasting!