
This guide walks through the process of creating a new podcast from scratch in AiO Podcast Studio. You will set the podcast title and description, upload your artwork, configure the fields that control how your show appears in podcast directories, and publish it so you can begin adding episodes.
Contents
- Step 1 — Open the New Podcast Screen
- Step 2 — Enter the Title and Description
- Step 3 — Podcast Details Tab
- Step 4 — Distribution Tab
- Step 5 — Assign a Category
- Step 6 — Publish the Podcast
Step 1 — Open the New Podcast Screen
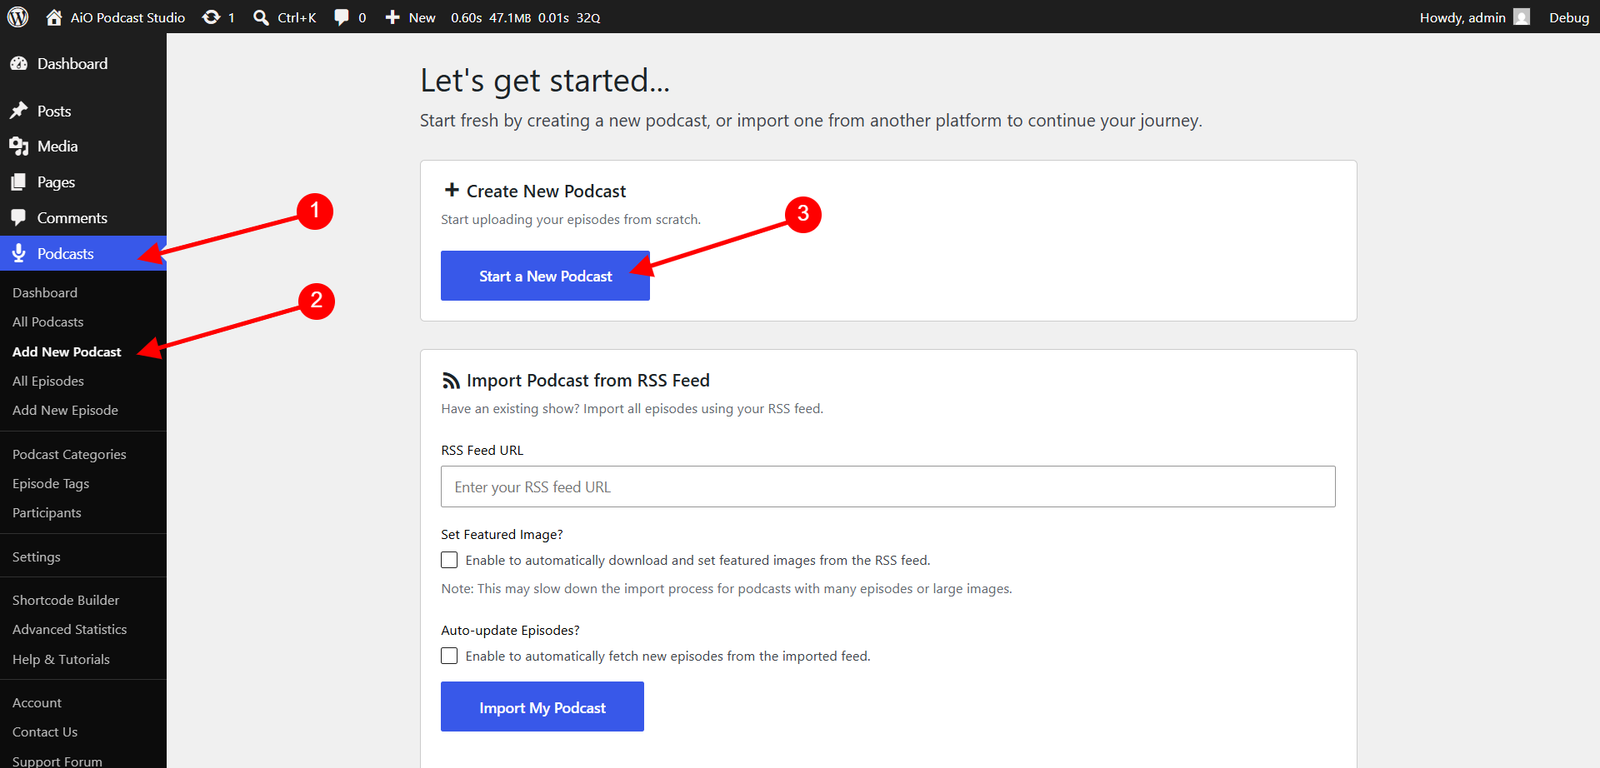
Navigate to Podcasts → Add New Podcast in your WordPress admin. A welcome screen appears offering two options: Create New Podcast and Import Podcast from RSS Feed. Click Start a New Podcast to open the podcast edit screen.
Step 2 — Enter the Title and Description
At the top of the edit screen, enter your podcast name in the Add title field. This becomes the public name of your podcast and is included in your RSS feed.
Below the title is the description editor. Write a summary of what your podcast is about. A clear, engaging description helps potential listeners decide whether your show is right for them, and it is also included in your RSS feed for podcast directories.
Step 3 — Podcast Details Tab
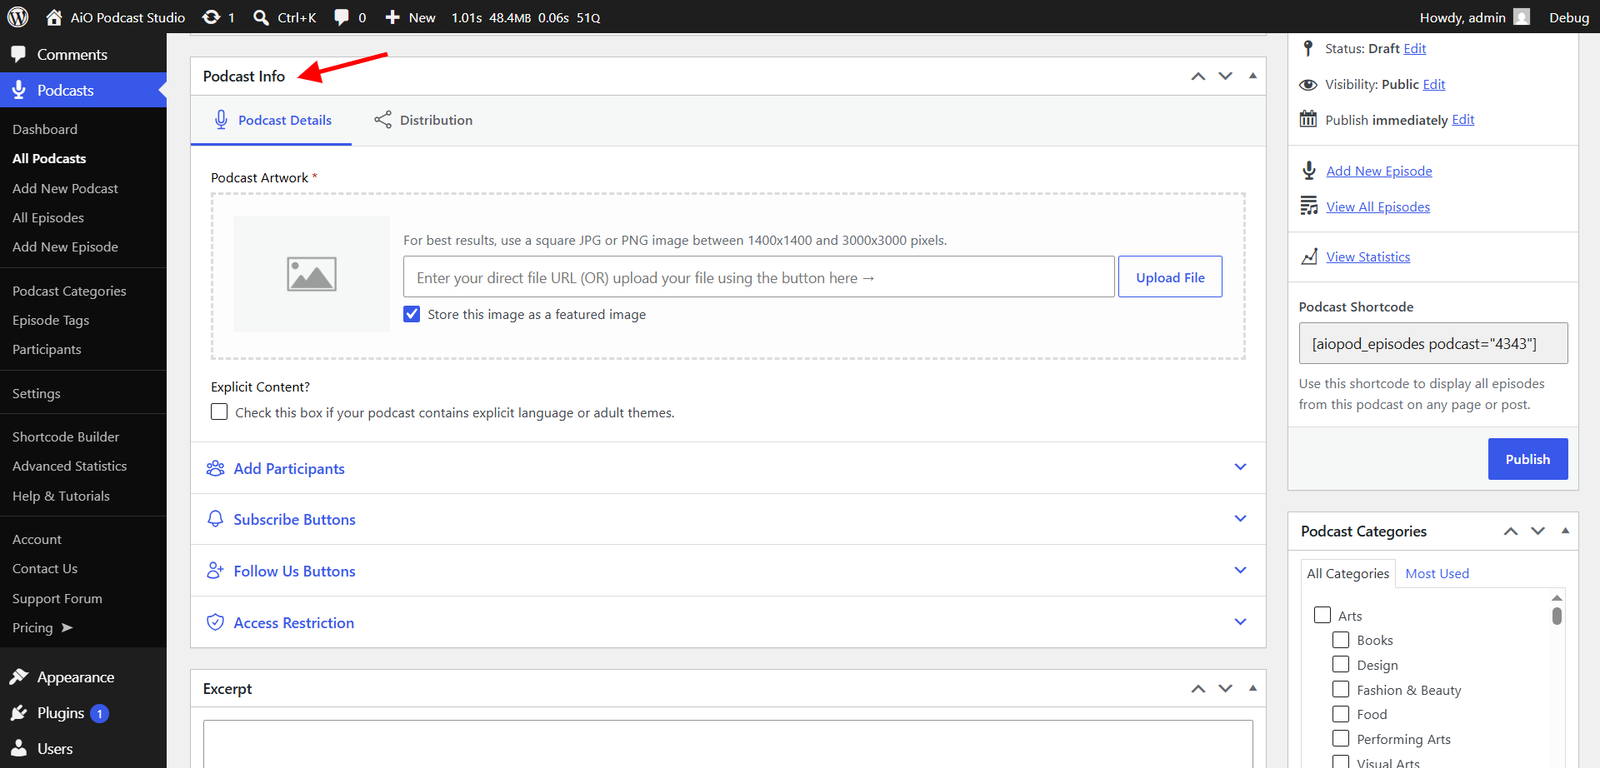
Below the description editor is the Podcast Info panel. It opens on the Podcast Details tab by default. This tab contains four sections.
Podcast Details (Required)
This section contains the two fields that must be filled in before the podcast can be published.
- Podcast Artwork — Upload the cover image for your podcast. Click Upload File to choose an image from your media library or upload a new one, or paste a direct image URL into the field. For the best results across all podcast directories, use a square JPG or PNG image between 1400×1400 and 3000×3000 pixels. If the Store this image as a featured image checkbox is visible, enabling it will also set the image as the WordPress featured image for the podcast post.
- Explicit Content? — Check this box if your podcast contains explicit language or adult themes. This flag is passed to podcast directories through your RSS feed.
Add Participants (Optional)
Participants are the hosts, guests, and contributors associated with your podcast. Click Add Participant, then select a name from the first dropdown and assign a role from the second. You can add as many participants as needed and reorder them by dragging the handle on the left of each row.
Participants must exist in the system before they can be selected here. To create a new participant, navigate to Podcasts → Participants in your admin sidebar.
Subscribe Buttons (Optional)
Subscribe buttons link listeners directly to your show on their preferred podcast app. Click Add Subscribe Button, choose a platform from the dropdown, and paste the URL of your show on that platform. Repeat for each platform where your podcast is listed. These buttons can be displayed on your podcast page using the plugin’s front-end templates.
Follow Us Buttons (Optional)
This section holds links to your podcast’s social media profiles. Enter the full URL for any of the following platforms: Facebook, Twitter / X, Instagram, LinkedIn, or YouTube. Leave any field blank if the platform is not in use.
Step 4 — Distribution Tab
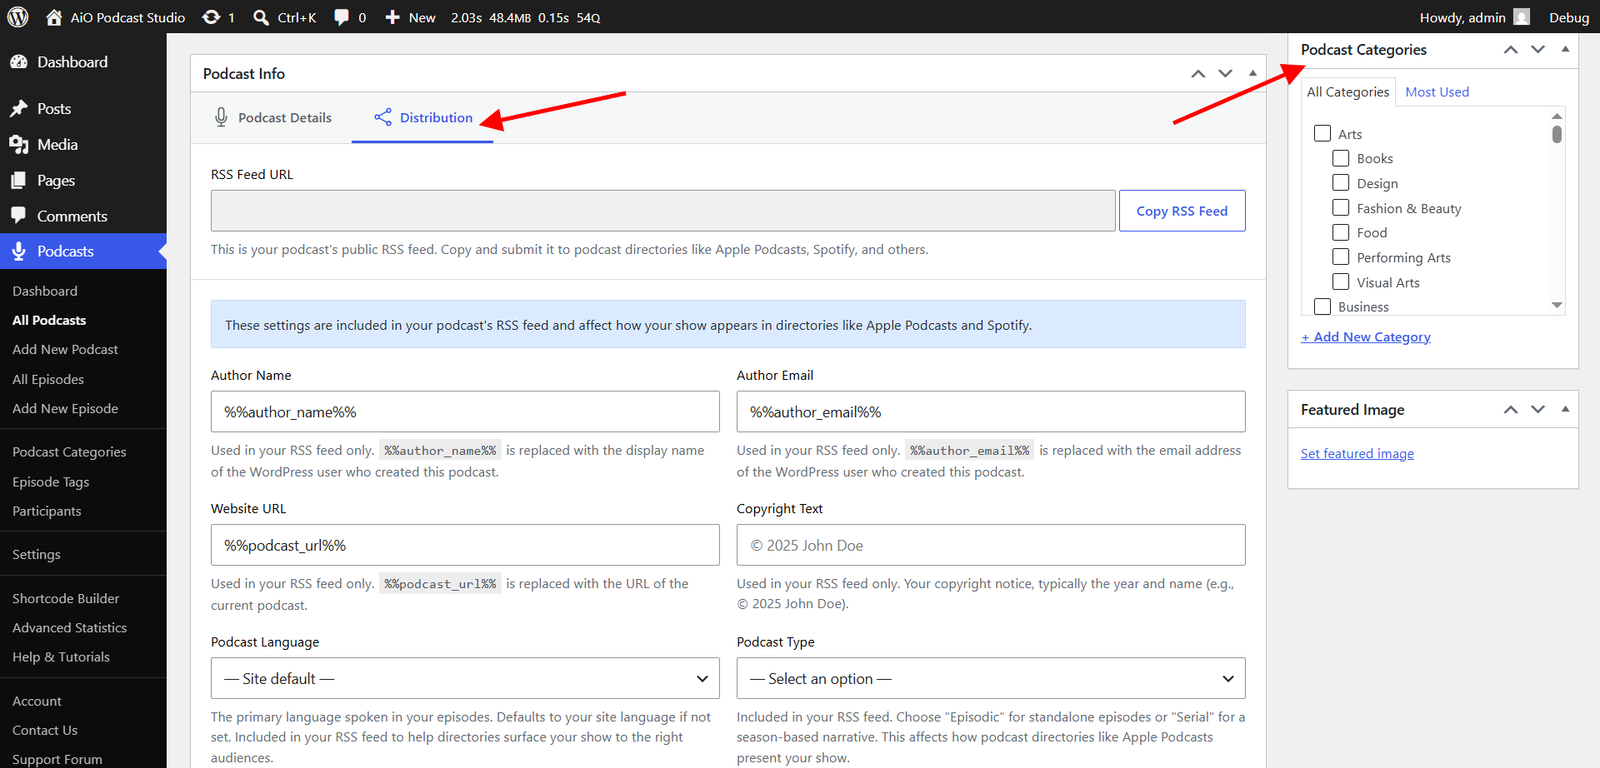
Click the Distribution tab in the Podcast Info panel. This tab contains the settings that control your podcast’s RSS feed and how it is distributed to external directories.
RSS Feed URL
Once the podcast is saved, this read-only field displays the public RSS feed URL generated by the plugin. This is the address you will submit to Apple Podcasts, Spotify, and other directories. Click Copy RSS Feed to copy it to your clipboard. This field is empty until the podcast is saved for the first time.
RSS Feed Settings
These fields are included in your podcast’s RSS feed and affect how your show is presented in podcast directories.
- Author Name — The name of the podcast’s author, as it will appear in the RSS feed. The placeholder
%%author_name%%is automatically replaced with the display name of the WordPress user who created the podcast. - Author Email — The contact email for the podcast’s author. The placeholder
%%author_email%%is automatically replaced with the email address of the creating user. - Website URL — The website associated with this podcast. The placeholder
%%podcast_url%%is automatically replaced with the podcast’s own URL on your site. - Copyright Text — Your copyright notice, typically the year and name — for example, © 2025 Jane Smith.
- Podcast Language — The primary language spoken in your episodes. Select from the dropdown. If left at the default, your site’s language setting is used.
- Podcast Type — Choose Episodic for standalone episodes that can be listened to in any order, or Serial for a narrative show that should be listened to in sequence. Apple Podcasts uses this value to determine how it presents your episodes to listeners.
- Mark as Complete — Enable this only if the podcast has ended and no further episodes will be published. This signals to podcast directories that they can stop checking your feed for new content.
Redirect and Blocking (Optional)
- Redirect URL — If you are moving this podcast to a different hosting platform in the future, enter the new RSS feed URL here. The plugin will include a redirect tag in your current feed, which most major directories honour when they check for the new location.
- Block from Directories — Enable this to prevent the podcast from being indexed by Apple Podcasts, Spotify, and other directories. Use this setting if you want to keep the podcast private or not yet listed publicly.
Step 5 — Assign a Category
In the right-hand sidebar, locate the Podcast Categories panel. Select one or more categories that describe the topic or genre of your podcast. If the appropriate category does not yet exist, click Add New Podcast Category to create it inline. Categories allow listeners to browse your content by topic on the front end of your site.
Step 6 — Publish the Podcast
When the required fields — title, description, and podcast artwork — are filled in and the distribution settings are configured, click Publish in the top-right panel to make the podcast live on your site.
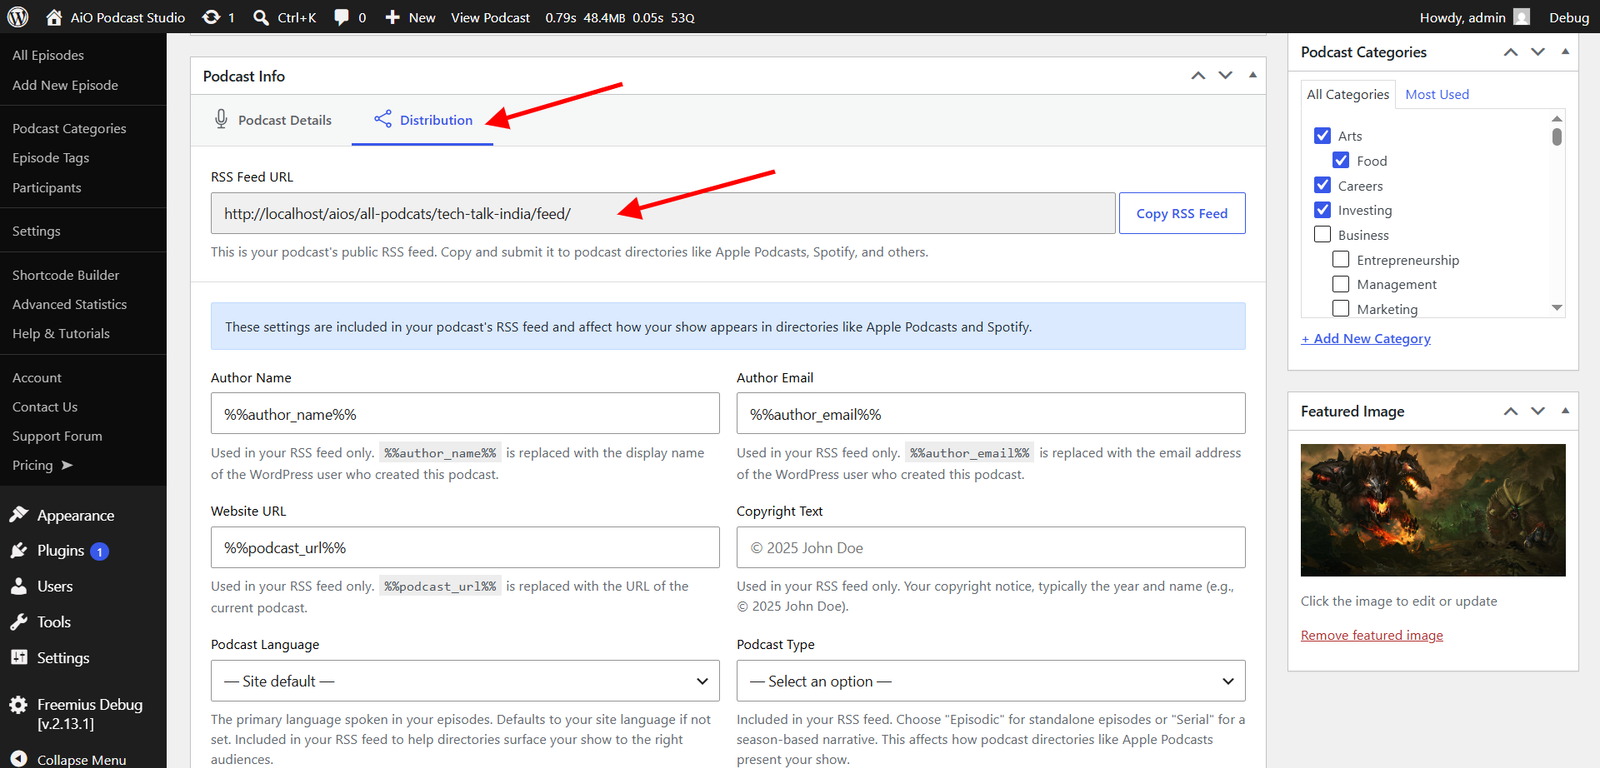
After publishing, the Distribution tab will display your podcast’s RSS feed URL. Copy this URL and submit it to the podcast directories where you want your show to appear — Apple Podcasts, Spotify, and any others you have chosen. Directories will use this URL to fetch your episodes, artwork, and metadata.
The Publish panel also displays two shortcuts: Add New Episode and View All Episodes. Once the podcast is published, use Add New Episode to begin adding content to it, and a Podcast Shortcode specific to this podcast will also appear in the panel, ready to paste into any page or post to display the episode list.